Update 2/4/2014 – Added notes about using service accounts as opposed to machine accounts for the AppPool running the web service
In the past I have posted on how to get Kerberos running for multi tier applications. Well as usual when I had to redeploy the application onto new hardware I found my notes were not as clear as I would have hoped. So here is what is meant to be a walkthrough for getting our application working in our TFS lab environment.
What we are building
Our lab is a four box system, running in a test domain proj.local
- ProjDC – the domain controller for the proj.local domain
- ProjIIS75 – a web server hosting our WCF web service
- ProjSQL2008R2 – the SQL box for the applications in the domain
- ProjSP2010 – a SharePoint server
The logical system we are trying to build is a SharePoint site with a webpart that calls a WCF service which in turn makes calls to a SQL database. We need the identity the user logs into SharePoint server as to be passed to WCF service via impersonation.
Though not important to this story, all this was all running a TFS Lab management infrastructure as a network isolated environment
Application Deployment
We have to deploy a number of layers for our application
DB
- Using a SSDT DACPAC deployment we created a new DB for our application on ProjSQL2008R2
- We grant the account (in this case a machine account projProjIIS75$) owner access to this DB (the WCF service will run as this account)
WCF Service
- Using MSDeploy we deploy a new copy of our WCF web site onto ProjIIS75.
- We bound this to port 8081
- We set the AppPool set to run as Network Service (the projProjIIS75$ account we just granted DB access to)
Updated note: You can use a domain service account here e.g. projappserviceaccount, but if you do this the Kerberos setting should be applied to the service account not the machine account) - We made sure the web site authentication is set enable for anonymous authentication, ASP.NET impersonation and windows authentication
- Set the DB connection string to point to the new DB on ProjSql2008R2, and other server specific AppSettings, in the web.config
- Made sure port 8081 was open on the firewall
SharePoint
- Add the WSP solution containing our front end to the SharePoint farm (you can use STSadm or powershell commands to do this)
- Using SharePoint Central Admin we deployed this solution to the web application
- Activated the feature on the site the solution has been deployed to.
- Create a new web page to host the webpart e.g. http://share2010.proj.local/sitepages/mypage.aspx (Note here the name we use to access this SharePoint site is share2010 not ProjSp2010. This host name is resolved via the DNS on ProjDC of our lab environment. This lab setup has a fully configured SharePoint 2010 with a number of web applications each with their own name and associated service accounts, this is important later on)
- We added our webpart to the page and set the webpart properties to
- The Url for the WCF web service http://ProjIIS75.proj.local:8081/callservice.svc
- The SPN for the WCF web service http/ProjIIS75.proj.local:8081
Note: we provide the URL and SPN as a parameters as we build the WCF connection programmatically within the webpart. This is as it would be awkward to put this information in a web.config file on a multi server SharePoint farm and we don’t want to hard code them.
Our Code
The WCF service is configured via its web.config
<system.serviceModel>
</system.serviceModel>
The webpart does the same programmatically
log.Trace(String.Format(“Using URL: {0} SPN: {1} “, this.callServiceUrl, this.callServiceSpn));
var callServiceBinding = new WSHttpBinding();
callServiceBinding.Security.Mode = SecurityMode.Message;
callServiceBinding.Security.Message.ClientCredentialType = MessageCredentialType.Windows;
callServiceBinding.Security.Message.NegotiateServiceCredential = false;
callServiceBinding.Security.Message.EstablishSecurityContext = false;
var ea = new EndpointAddress(new Uri(this.callServiceUrl), EndpointIdentity.CreateSpnIdentity(this.callServiceSpn));
callServiceBinding.MaxReceivedMessageSize = 2000000;
callServiceBinding.ReaderQuotas.MaxArrayLength = 2000000;this.callServiceClient = new BlackMarble.Sabs.WcfWebParts.CallService.CallsServiceClient(callServiceBinding, ea);
this.callServiceClient.ClientCredentials.Windows.AllowedImpersonationLevel = TokenImpersonationLevel.Impersonation;
this.callServiceClient.Open();
Getting the Kerberos bits running
First remember that this is a preconfigured test lab where the whole domain, including the SP2010 instance, is already setup for Kerberos authentication. These notes just detail the bits we need to alter to check.
To make sure out new WCF series works in this environment we needed to do the following. All this editing can be done on the domain controller
-
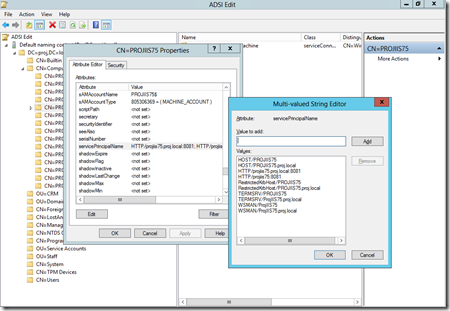
Using ASDIEDIT, make sure the the computer running the WCF web service, ProjIIS75, has any entry in it’s ServicePrincipalName for the correct protocol and port i.e. **HTTP/projiis75.proj.local:8081
**Update note: If using a service account as opposed to the machine account, network service, you make the same ServicePrincipalName edits but to the service account projappserviceaccount.
You should only add an SPN entry in one place, if you enter it in two nothing will work, so make sure the SPN is applied to the account the AppPool will run as where it be the machine account if you using network service or the service account if a domain account is being used. -
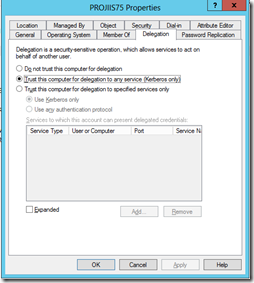
Using Active Directory Users and Computers tool make sure the computer running the WCF web service, ProjIIS75, is set to allow delegation
Update note: If using a service account as opposed to the machine account, network service, you make the same edits but to the service account projappserviceaccount. -
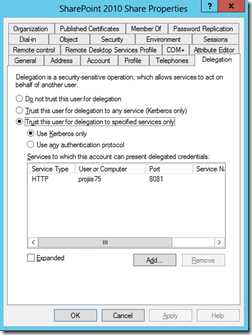
Using Active Directory Users and Computers tool make sure the service account running the Sharepoint web application, in our case projsp2010_share, is set to allow Kerberos delegation to the computer SPN set in step 1. HTTP/projiis75.proj.local:8081. To do this you press the add button, select the correct server then pick the SPN from the list.
IMPORTANT Now you would expect that you could just set the ‘Trust the user for delegation to any service’; however we were unable to get this to work. Now this might just be something we set wrong, but if so I don’t know what it was.
Once this was all set we did an IIS reset on ProjSP2010 and reloaded the SharePoint page and it all leapt into life.
How to try to debug when it does not work
There is no simple answer to how to debug this type of system, if it fails it just seems to not work and you are left scratching your head. The best option is plenty of in product logging which I tend to surface using DebugView, also WCFStorm can be useful to check the WCF service is up
So I hope I find this post useful when I next need to rebuild this system. Maybe someone else will find it useful too.


