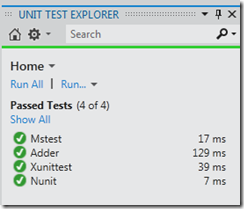
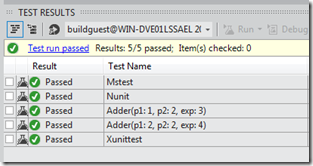
One of my favourite new features in VS11 is that the unit testing is pluggable. You don’t have to use MSTest, you can use any test framework that an adaptor is available for (at the release of the beta this meant the list of framworks on Peter Provost’s blog, but I am sure this will grow).
So what does this mean and how do you use it?
Add some tests
First it is worth noting that you no longer need to use a test project to contain your MSTest, you can if you want, but you don’t need to. So you can
- Add a new class library to your solution
- Add a reference to Microsoft.VisualStudio.TestTools.UnitTesting and create an MStest test
- Add a reference to xUnit (I used NuGet to add the reference) and create an XUnit test
- Add a reference to XUnit extensions (NuGet again) and add a row based xUnit test
- Add a reference to nUnit (you guessed it - via NuGet) and create a nUnit test
All these test frameworks can live in the same assembly.
Add extra frameworks to the test runner
By default the VS11 test runner will only run the MStest test, but by installing the xUnit.net runner for Visual Studio 11 Beta and NUnit Test Adapter (Beta) either from the Visual Studio gallery or via the Tools –> Extension Manager (and restarting VS) you can see all the test are run
You can if you want set it so that every time you compile the test runner triggers (Unit Testing –> Unit Test Settings –> Run Test After Build). All very nice.
Running the tests in an automated build
However, what happens when you want to run these tests as part of your automated build?
The build box needs to have have a reference to the extensions. This can be done in three ways. However if you are using the new TFSPreview hosted build services, as announced at VS Live, only one method, the third, is open to you as you have not access to the VM running the build to upload files other than by source control.
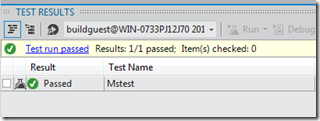
By default, if you create a build and run it on the hosted build you will see it all compiles, but only the MStest test is run
The fix is actually simple.
-
First you need to download the xUnit.net runner for Visual Studio 11 Beta and NUnit Test Adapter (Beta) .VSIX packages from Visual Studio Gallery.
-
Rename the downloaded files as a .ZIP file and unpack them
-
In TFSPreview source control create a folder under the BuildProcessTemplates for your team project. I called mine CustomActivities (the same folder can be used for custom build extensions hence the name, see Custom Build Extensions for more details)
-
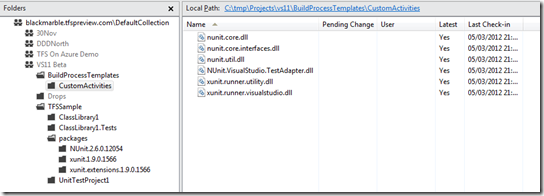
Copy the .DLLs from the renamed .VSIX files into this folder and check them in. You should have a list as below
-
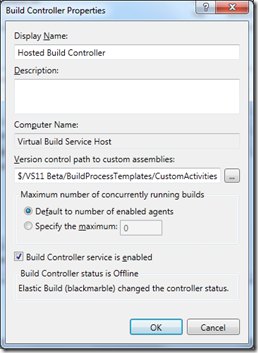
In the Team Explorer –> Build hub, select the Actions menu option –> Manage Build Controllers. Set the Version control path for custom assemblies to the new folder.
You do not need to add any extra files to enable xUnit or nUnit tests as long as you checked in the runtime xUnit and nUnit assemblies from the Nuget package at the solution level. This should have been default behaviour with NuGet in VS11 (i.e. there should be a package folder structure in source control as shown in source explorer graphic above)
You can now queue a build and you should see all the tests are run (in my case MStest, XUnit and nUnit). The only difference from a local run is that the xUnit row based tests appear as separate lines in the report
So now you can run tests for any type on a standard TFSPreview hosted build box, a great solution for many projects where just a build and test is all that is required.
